
Thursday, 7 October 2010
Face update.....
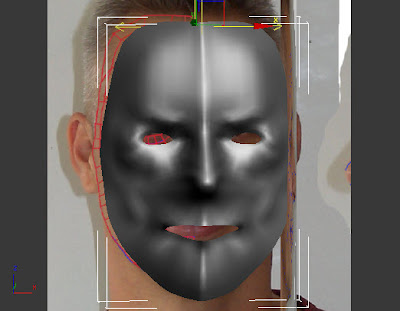
Here, I've added some basic eyeballs and altered the skin tone to make it look a little more realistic. Hopefully at some point, I'll drop some better material onto the face.


Client Led Brief....First thoughts...
First Thoughts...
Colchester VIC 
I put the question to her of what makes Essex special as a tourist attraction. She explained that the biggest strength of the county is the diversity; the Roman history, museums, culture, coastline, castles, shopping, wildlife reserves etc.
Whilst there I also had the oppertunity to collect a large amount of promotional material to act as inspiration.

My first thoughts of the brief were that it was a little vague, I needed to find out more about what was actually required.
To this end, I contacted Elli by email and arranged a meeting for the 8th of October with her at her office in Chelmsford to give the group a chance to gain a better appreciation of what was required.
I also visited the Visitor Information Centre (VIC) in Queen Street Colchester to speak to the senior member of staff.
Colchester VIC

I put the question to her of what makes Essex special as a tourist attraction. She explained that the biggest strength of the county is the diversity; the Roman history, museums, culture, coastline, castles, shopping, wildlife reserves etc.
Whilst there I also had the oppertunity to collect a large amount of promotional material to act as inspiration.
The leaflets I collected

Client Led Brief
Alongside the face task we also have a Client Led Brief which involves creating an animation to sell Essex as a tourist destination.
We are working with Elli Constantatou, the Tourism, Marketing and PR Manager at Essex County Council.
The brief calls for small teams to produce an animation that challenges the perceptions of Essex and promotes an area of Essex that is dear to our hearts.
Once the brief had been recieved I joined Gemma and Richard to form a group and we had our first brainstorming session.
We are working with Elli Constantatou, the Tourism, Marketing and PR Manager at Essex County Council.
The brief calls for small teams to produce an animation that challenges the perceptions of Essex and promotes an area of Essex that is dear to our hearts.
Once the brief had been recieved I joined Gemma and Richard to form a group and we had our first brainstorming session.
Adding the lips and eyelids...
By connecting rings of edges around the lips and eye sockets I was able to add more polygons and increase the definition of these areas.
I'm quite pleased with how it's coming along. Plenty more to do though.

I'm quite pleased with how it's coming along. Plenty more to do though.

Wednesday, 6 October 2010
Improving my face :oD
Here, I've smoothed out a central peak that appeared after mirroring the two face halves and began to reposition polygons.
Additional polygons have been created around the nostrils to give a more realistic form.

Additional polygons have been created around the nostrils to give a more realistic form.

Mirroring the face....
Once half of the face was created and roughly correct, I needed to copy it over. Although there are several ways of doing this, the Symmetry function is the most suitable.
Select object/Apply Symmetry modifier/Select mirror axis/Flip.
Expand Symmetry by clicking on the plus sign/select mirror/move mirror plane
Under Modifier list, select Show End Result icon.
Here is my rough face shape mirrored over
Select object/Apply Symmetry modifier/Select mirror axis/Flip.
Expand Symmetry by clicking on the plus sign/select mirror/move mirror plane
Under Modifier list, select Show End Result icon.
Here is my rough face shape mirrored over

I'll now improve it by moving the polygons around using the sketched topography as my guide.
Creating polygons from scratch....
Now the topography has been sketched out, the polygons can now be created using the sketched lines as references.
- Create/Shapes/Line/Select points
- Set snap (magnet with a 3 icon at top) create all polygons.
- Convert to editable poly
- Weld vertices together: select all vertices/Edit vertices/Weld (click on box) /Reduce threshold to zero, then come up one click.
- Align all centre vertices to create nice mirror edge: Select all vertices/Edit geometry/Make planar/Select X,Y or Z)
Here, I've created all the polygons and began to drag them out into their positions:


Subscribe to:
Posts (Atom)