Wednesday, 10 November 2010

Modelling the Jam Factory.....

I'm aiming to concentrate the animation on the reflection of the factory in the Jam Jar but need to model a basic factory building arrangement so that the camera can pan round and see where the jam is produced.

The factory models only need to be basic with not too much detail but at least give a nod to the actual buildings.
I've started with the main entrance buildings, using low poly models and applying basic brick and woodwork materials.
The doors and sign are simple images grabbed from Google and modified in Photoshop.


Update:

Done a little more to the building now. I've added the wall and railings around the outside seating area and constructed a better door.

The door is constructed from basic polygons and I've added another thin box behind it to act as the glass plane.

Material is from the Raytrace/Arch and Design set as follows....

I've altered the settings to achieve good reflection properties but very little transparency as the interior of the building is not detailed.

Monday, 8 November 2010

Jammy goodness........ :o)

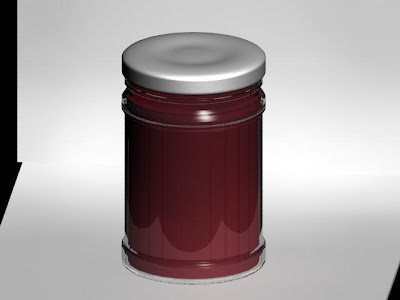
For the Tiptree Jam Factory (Wilkins and Sons) I'm going to try for a strawberry jam jar reflecting the factory. The camera will then pan round to see the buildings (hopefully ;o)

For the jam jar, I sketched a Spline Curve.....


Then revolved it round using the Lathe Tool...


For the glass effect, I set the material type to Raytrace and the settings as follows.....


This gave me a nice see through glass effect.... (At the moment, the 'jam' is just a red cylinder)


For the lid I used a shaped Cylinder with polygons pushed in and out then Turbosmoothed...


Just need to figure out how to get the label on the jar now ;oD

For the 'strawberry jam' I experimented with several different types of material maps before finaly adding a Speckle Map to the Bump channel then set the colour options to different shades of red. It gives a nice jammy effect :o)


Update..... Got the labels on now :o)
The label images were modified in Photoshop then aplied to the Material of a cylinder which is just proud of the glass surface. For the label on the glass, the image had a black and white Mask which was added to the Opacity Channel which sees black as transparent.


Populating the scene.....

I saved a version of the male model and moved a few polygons to create a female version. These were then added to the scene.
By copying (Move and Shift) the people, then changing the colour of the clothes they look less like clones.

.
I scaled some of the people to create children too.
.

Friday, 5 November 2010

Low poly people.....

The scenes looked a bit sterile without scenery and people so I thought I'd model some low poly people.
I started with a basic Box and Extruded Polygons as and when I needed them.


Then once complete, I added a Turbosmooth.
.


Finaly, I added some basic colour Materials. So that the same colourscheme wasn't used over and over in crowd scenes, I've used Created Groups for the Polygons eg: Shirt Group. This way, it'll be easy to select the various elements and change the colour.

Adding materials to the VAF....

The exterior of the VAF has a semi shiny copper coloured cladding. To replicate this, I've changed the Renderer to Mental Ray, then selected a metal finish from the Arch and Design set.


The grass and tarmac have Bump Maps with Noise applied to give them a bit of texture.


This inside view of the building shows the side windows leading out to the decking area. The walls won't be this shiny in the final model.


The glass is also selected from the Mental Ray Arch and Design set.


Wednesday, 3 November 2010

Modelling a basic tree....

To populate our Essex scenes, I though it may be an idea if we had some low poly trees for the background.
I started with a Standard Primitive Cylinder that was scaled up to taper it. Sections were then moved to form a more realistic trunk shape.


Branches were grown from the trunk by selecting adjacent lines then using the Connect Tool, then Extruding the polygons out.


Vertices were then moved around to make the trunk less uniform.

To quickly populate the tree with leaves, I grabbed an image from Google and isolated it in Photoshop then applied it to a plane. Planes were then copied, rotated and scaled in various positions on the branches.

A basic bark material was also sourced from Google then applied to the trunk and adjusted with the UVW tool.


Here's a render of the final tree model. It looks ok and is not intended to be photo realistic as it's just for the backgrounds.


Tuesday, 2 November 2010

Modelling the VAF.....

A new exhibition centre is being built in Colchester to display different forms of art and culture. It's being referred to as the Visual Arts Facility or VAF or sometimes the First Sight gallery until a permanent name is chosen.
It has a striking metallic cladding on the outer skin which has proved troublesome to the contractors causing the project to go over budget and deadline.

Initial concept image...


Modelling the VAF....

Because of it's complex structure I couldn't use standard primitives as the basis for the model and after a few modelling trials of differing methods, I went with using a sweep of the buildings profile following an arc shape path.

The Sweep profile..


And the resulting Swept model...


From there I curved the roof slightly by moving some of the Vertice's up and built on the two other roof profile sections using Polygon/Extrude.


The inside of the structure is also populated with polygons as I'm hoping to do a Fly Through of the interior in the final animation.

The underside....


To create the decking area I separated the Polygons using the Connect function, then deleted those that would form the windows. Additional polygons were then Extruded on to form the decking and railing.

The decking area...