It was a really good idea to work closely with the client, Elli from Essex County Council. It meant she was able to guide us both with ideas and content.
It was felt that the brief was vague but Elli soon described exactly what she required and expected.
Team working worked really well between two members of the team. Models were shared and technical issues could be shared and resolved. Significant modelling and animation time was put in by the two, in one instance reaching 66 hours in a week.
It was good to 'push the envelope' by trying new modelling and animation techniques too, including Particles and Water Reactor.
Selecting a really great tune lifted the whole animation too and we felt it created just the right vibe for our final clip.
Overall I am really proud of our animation and what I achieved during this module. Many thanks go to my colleagues, our client and the lecturers for their assistance.
Friday 10 December 2010
What didn't go well......
There were some issues with one of the group members rarely attending uni. This was frustrating for the remaining group members and led to whole scenes not being created.
The issue with Premiere not being on Windows slowed down progress as it meant logging off and logging back into Mac just to view and adjust clips.
Rendering took too long on the uni PC's and they often crashed with networking issues. It was found that network rendering could significatly improve times but only when there were spare machines which was rare. We found ourselves having to stay late in the evenings and having very early starts to get the jobs done. 12 hour days were not unusual.
Teamworking.....
Unfortunately we had some teamworking issues with a member rarely turning up at uni. This caused the remaining group members some significant issues with loss of their contribution. I found myself spending more and more time trying to motivate the individual and helping them with modelling and animating their scenes.
Top ensure the final animation 'flowed' well it was important to ensure the quality of all models and animations was of an adequate standard. I created a complete scene for the individual where the camera pans down from the bungalow to the secret nuclear bunker. This tied the scenes together and shows how the two buildings are linked.
The two remaining group members worked very well together sharing files and helping resolve issues. These 'shared' models included low poly people, hand, spade, postcards and stand.
By using the people in several scenes we reduced the need for rework which was handy.
Premiere Pro.....
We had some issues with Premiere Pro which made it a time consuming process. For some reason the windows PC's were not loaded with Premiere Pro and the Mac machines were not loaded with 3DsMax. This meant we had to log out of one just to review a clip we had created.
Hopefully this will be rectified for next years students as I flagged up the issue to the tutors.
Once the group had contributed to the animations, I imported them into Premier Pro and altered speeds, lengths and scene sequences.
The final step was to add the soundtrack we'd chosen which was 'Amazing' by Bruno Marrs.
I was quite pleased with the final animation and proud of what we'd achieved.
Tuesday 30 November 2010
Yet more new stuff.....
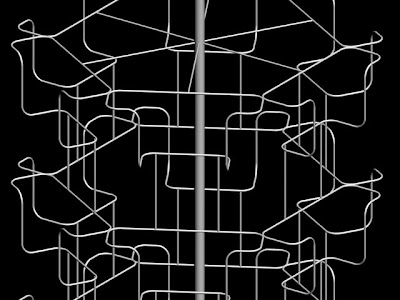
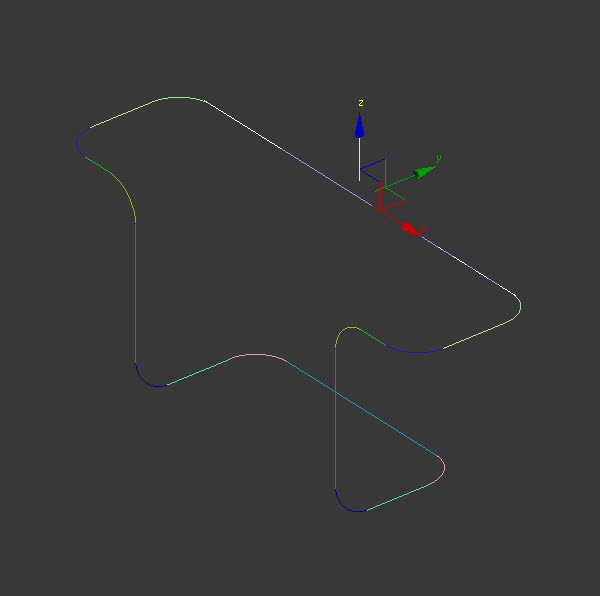
Our animation is based around postcards so I needed to model a display stand to hold them. It would of been tricky to use set 3DsMax shapes so I decided to try the Sweep Tool.
I first sketched spline curves in 3 dimensions....
.


.
.
.
I first sketched spline curves in 3 dimensions....
.
.
Then selected the Sweep Modifier. This sends a set profile along the spline. I then selected a circular profile and set an appropriate radius.
.

.
Once the single postcard holder was modelled, I copied at around at 60 degrees to give cluster of 6.
.

.
The cluster was then copied up 5 times and internal supports added....
.
.

.
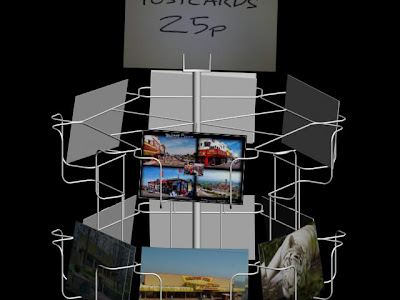
Here's a rough test render showing some cards on display.........
.
For the postcards, we'll be using the Rotoscope technique to animate the imges running animated clips. I hope nobody copies this idea as it's looks really cool :o)
.

Monday 29 November 2010
More new stuff........
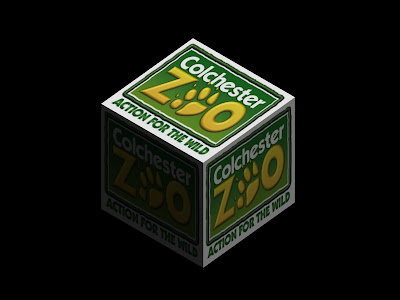
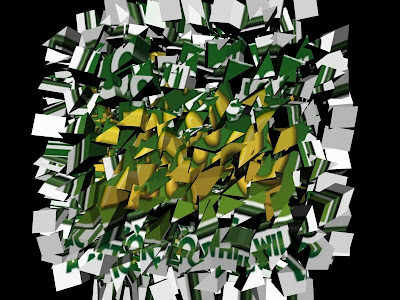
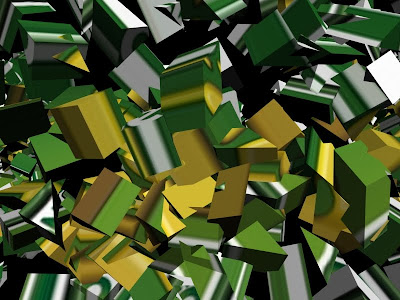
To start the Colchester Zoo clip, I wanted to animate the Action For The Wild logo...........
.

 .
.

.
Here are some screengrabs of the exploding logo....


.

.
I originaly thought about a spinning cube with the logo applied on as material....
.

This was ok but to further experiment with new techniques, I wanted to have a go with the Particle System PArray tool. This can be used to explode an Editable Poly.
I used the same cube and linked it to a PArray object.
I selected the following options in the Partical System modifier....
Object Fragments
Number Of Chunks
Viewport Display - Mesh
Picked Emitter
GetMaterial From
Once the options were selected, the timeline slider could be used to view the result.
I changed the settings below to achieve the result I was after......
.

.
Here are some screengrabs of the exploding logo....
.

.

.

.

.
I used a camera with a clipped focal plane to ensure the particals flew completely past the rendered clip.
Here is a screengrab of the cube, partical system and camera in the scene....
.

Tuesday 23 November 2010
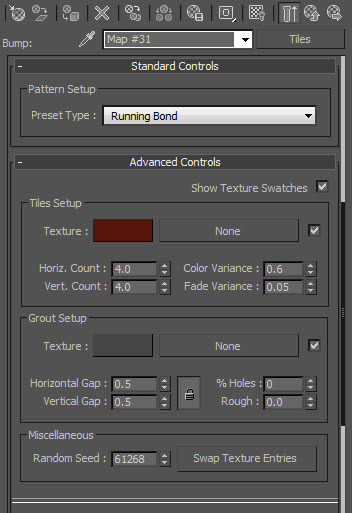
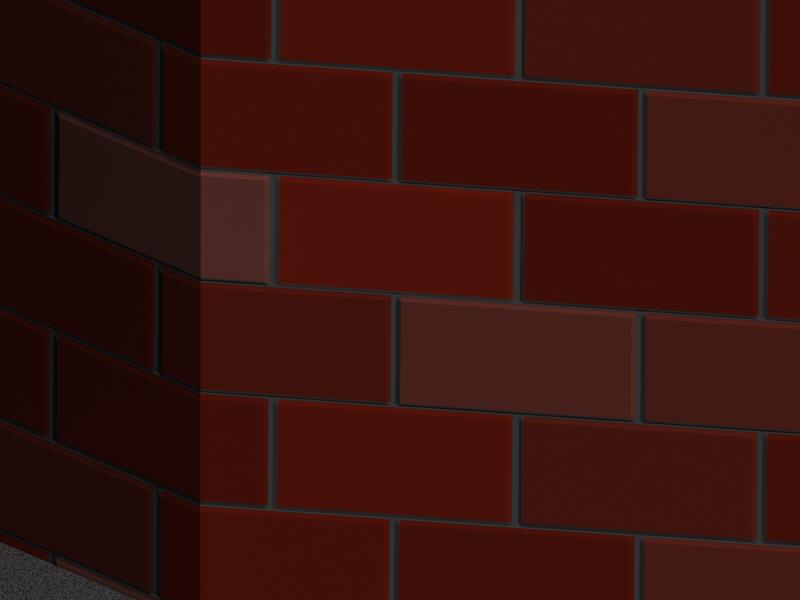
Building Bricks.....
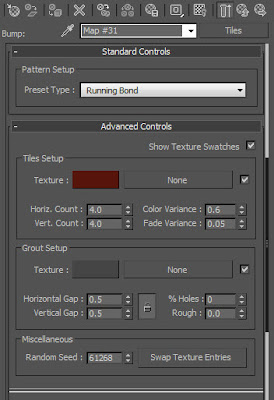
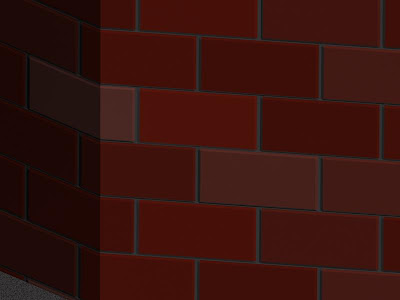
Experimenting with different material and modelling tecniques, I used basic boxes to create the walls in the Tiptree Jam Factory scene then applied some special material....
.
.
Once this is applied to the materials Diffuse Color Map, It can be copied down to the Bump Map Channel to create 'recesses' where the cement/grout is between the bricks giving a nice brickwork effect...
.
Applying some Noise to the material also helps break up the regular shape.
.
.
.
Once this is applied to the materials Diffuse Color Map, It can be copied down to the Bump Map Channel to create 'recesses' where the cement/grout is between the bricks giving a nice brickwork effect...
.
Applying some Noise to the material also helps break up the regular shape.
.
Subscribe to:
Posts (Atom)