Monday, 18 October 2010

Stylin'.... ;op

I found the Hair and Fur styling tool quite addictive ;oD

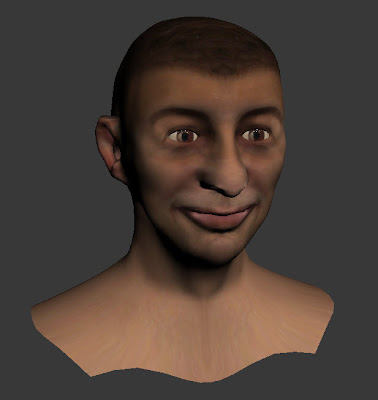
I don't really know what all the individual functions do but it looks like a really powerful tool. In this shot, I've cropped my hair a little closer and clumped some areas together. I've also changed the tone to brown. I've taken a few years off myself by not having 'too' much grey ;oD

To achieve this, I used the styling function to brush and cut the hair into my rough style.


.

Roughly speaking.... :o)

After I was fairly happy with the model, I applied a Morpher with 6 different expressions. I now have a model that appears to speak frown, swallow and blink :o)

.

And what didn't go well...

A fundamental problem with the tutorials was that they are now a different version/release to the uni's. This meant that when the tutorial called for a menu or function it sometimes wasn't to be found in the same location. In some cases, toolbars or icons were completely different. This caused a certain amount of searching and timewasting.

I had some issues caused by the amount of polygons. I found that when I attached the back of the skull and the ear, it was difficult to get the right amount of vertices to attach to.
It was basically a compromise of sufficient polygons to define my features along keeping the overall poly count to a reasonable amount.

As previously mentioned, the UVW Unwrapping process crashed and burned when I reapplied the skin to my face as it has somehow became misaligned. Realigning soon solved the issue.

The area where the ear joins the head isn't great. I think when I separated the ear from the head in the UVW Unwrapping, I should of ignored the tutorials advice and cropped the polygons in closer, rather than having some in front of the ear.

What went well....

It was relatively easy to follow the tutorial videos and as a result, I was able to go at my own speed. This suited me as I could repeat anything I didn't really understand.

I've done a fair bit of drawing and painting so I had a rough idea of the topography of a face which helped a little :o)

I'm pleased with the overall result and think it looks a little like me. Or is it a caveman? :oD

I learnt a lot from this task including material finishes, hair and a new way of model making using seperate polygon creation techniques.

Adding hair....

Although the tutorial videos didn't include hair, I've played around with the Hair And Fur modifier.
To make it easier to work with, I copied all the polygons that would have hair applied and loaded them up in a separate Max file.
I then applied hair to the entire scalp model then cut and styled it so that it was roughly similar to mine.

Skin high and lowlights.....

To create a more realistic skin tone, I added high and low areas to simulate the shine caused by oily areas of the face like the nose and cheeks.

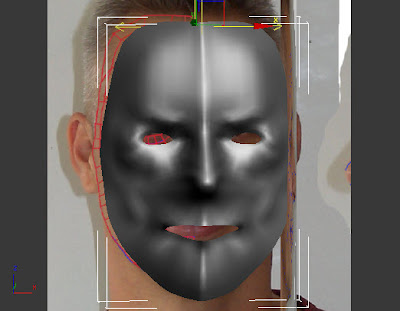
Here's how the Specular Map looked in Photoshop....


And the effect on the skin once it had been loaded into the material channel....


I played around with the levels until I was happy with the results. Having the Specular level too high caused way too much glare on the face so I turned it down to 35 which seemed about right.

The materials channels:

Texturing the face....

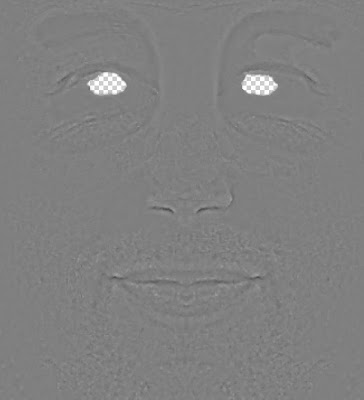
To texture my face, I followed tutorial 11 which introduced a Bump Map to the face by overlaying a copy of my photoshopped skin file with Filter/Other/High Pass which essentially picks out contrasting high and low detail in monochrome.

Once carried out, this is what the mask looks like:


And here's the effect it creates when it's applied to the materials Bump Map:

Friday, 15 October 2010

Eye Eye..... :o)

Although not covered in the tutorials, i felt that the model looked odd without an eye so I downloaded an image from Google of somebodies eye, manipulated it in Photoshop then applied it as a Bitmap Material to a Sphere.
Having eyeballs in place also allows for the polygons around the eye to be correctly positioned.


In the final model, I turned down the contrast on the eyes as they seemed a touch too perfectly white.

Fixing the skin issues...

I became frustrated with the botched reasult and asked the tutor for help. It transpired that I'd somehow managed to move the skin image on the Unwrap map causing a misalignment when it was applied to the model.
This was rectified by moving the 'skin' back to the side until the features lined up.

The material was then reaplied as a Bitmap and this was far better..... The hair in particular is much more realistic.


By switching back and forth between the Photoshop Image and the head model, I was able to make adjustments to areas that didn't line up. The eyebrows sat too low, the lips were too wide and the eyes weren't quite in line. Luckily the software packages acted 'parametrically' meaning that updates happen in the model when it was moved so long as the Photoshop image was saved.

Sticking on the skin.........

Once I tinkered for hours and hours with the unwrapped Photoshop image, I applied it to the models material. This didn't go particularly well the first few times, in fact my head looked more like a Picasso painting with two eyes on one side of my face :oD

Using a UVM Map I was able to manipulate the material but this was just a botch job. Here's the first version...

The unwrapped skin.....

Here is the finished 'skin' as heavily modified in PhotoShop. The cut outs in the main head piece are for the ears below.

Applying material / skin to the face.

Following the tutorial, I used the UVW Unwrap tool to take the quadrents of the head and lay them out flat to allow segments of the original photo to be cut out and repositioned on the flat map.

In the first step of the flattening process, some areas of the map needed to be altered as they were cluttered or overlapping. These were 'Relaxed' into more suitable positions.

Applying a Checker Material to the model displays clearly how quadrents will be treated once the 'skin' is applied. Areas that are too stretched need to be Relaxed.

Hey? What did you say?

Modelled the ear now by using a similar technique to the face. Sketching the topography in Photoshop then creating quadrants in 3DSMax which were then repositioned.

For the ear canal, I used the Chamfer tool which created another ring of edges that could then be pushed in to create a void.


Tuesday, 12 October 2010

Adding the neck and shoulders.......

On the original Photoshopped image, I sketched on the topography of the neck and shoulders. I then created polygons and positioned them.

The original face was then joined to the back of the head and neck using the attach tool.

Symmetry and Turbosmooth were then re-applied.

Extending the head...

To try and speed up the modeling of the top and back of the head, I used a sphere which was crushed slightly then the polygons not required were deleted.


Edges were then copied down and roughly alligned. Vertices were then positioned on top of existing ones using the snap.

Thursday, 7 October 2010

Face update.....

Here, I've added some basic eyeballs and altered the skin tone to make it look a little more realistic. Hopefully at some point, I'll drop some better material onto the face.

Client Led Brief....First thoughts...

First Thoughts...
My first thoughts of the brief were that it was a little vague, I needed to find out more about what was actually required.

To this end, I contacted Elli by email and arranged a meeting for the 8th of October with her at her office in Chelmsford to give the group a chance to gain a better appreciation of what was required.
I also visited the Visitor Information Centre (VIC) in Queen Street Colchester to speak to the senior member of staff.

Colchester VIC


I put the question to her of what makes Essex special as a tourist attraction. She explained that the biggest strength of the county is the diversity; the Roman history, museums, culture, coastline, castles, shopping, wildlife reserves etc.

Whilst there I also had the oppertunity to collect a large amount of promotional material to act as inspiration.

The leaflets I collected

Client Led Brief

Alongside the face task we also have a Client Led Brief which involves creating an animation to sell Essex as a tourist destination.
We are working with Elli Constantatou, the Tourism, Marketing and PR Manager at Essex County Council.

The brief calls for small teams to produce an animation that challenges the perceptions of Essex and promotes an area of Essex that is dear to our hearts.

Once the brief had been recieved I joined Gemma and Richard to form a group and we had our first brainstorming session.

Adding the lips and eyelids...

By connecting rings of edges around the lips and eye sockets I was able to add more polygons and increase the definition of these areas.

I'm quite pleased with how it's coming along. Plenty more to do though.

Wednesday, 6 October 2010

Improving my face :oD

Here, I've smoothed out a central peak that appeared after mirroring the two face halves and began to reposition polygons.
Additional polygons have been created around the nostrils to give a more realistic form.


Mirroring the face....

Once half of the face was created and roughly correct, I needed to copy it over. Although there are several ways of doing this, the Symmetry function is the most suitable.

Select object/Apply Symmetry modifier/Select mirror axis/Flip.
Expand Symmetry by clicking on the plus sign/select mirror/move mirror plane
Under Modifier list, select Show End Result icon.

Here is my rough face shape mirrored over


I'll now improve it by moving the polygons around using the sketched topography as my guide.

Creating polygons from scratch....

Now the topography has been sketched out, the polygons can now be created using the sketched lines as references.
  • Create/Shapes/Line/Select points
  • Set snap (magnet with a 3 icon at top) create all polygons.
  • Convert to editable poly
  • Weld vertices together: select all vertices/Edit vertices/Weld (click on box) /Reduce threshold to zero, then come up one click.
  • Align all centre vertices to create nice mirror edge: Select all vertices/Edit geometry/Make planar/Select X,Y or Z)

Here, I've created all the polygons and began to drag them out into their positions: